Sails.js | MVC Framework for Node.js

Introduction
Sails.js is a popular MVC (Model-View-Controller) framework built on top of Node.js that simplifies building scalable and real-time web applications. In this tech blog, we will create a web app with Sails.js and set up a MySQL database connection. Additionally, we will compare Sails.js with Express.js, another widely used Node.js framework.
Sails.js is actively being used in the wild by companies like Postman, Paystack, and DevMountain to build out their Web APIs to power their various clients.
Core Principles of sails.js
Convention over Configuration: Sails.js provides default values and sensible conventions to minimize configuration, this approach allows developers to focus on building their application’s business logic instead of spending time on repetitive configuration tasks.
Model-View-Controller (MVC) Architecture: Sails.js follows the MVC architectural pattern, which helps in organizing code and separating concerns. The model represents the data and handles database operations, the view handles the presentation logic, and the controller acts as the intermediary between the model and the view, handling the application’s business logic.
Automatic RESTful APIs: One of the key features of Sails.js is its ability to automatically generate RESTful APIs based on the defined models. By simply creating a model, Sails.js generates CRUD (Create, Read, Update, Delete) routes and controller actions, making it easy to build API endpoints for data manipulation.
Real-time Communication: Sails.js provides built-in support for real-time communication through WebSockets. This allows developers to build applications that can push data updates in real-time to connected clients. Sails.js utilizes the concept of “pub/sub” (publish/subscribe) to enable real-time messaging between clients and the server.
Database Flexibility: Sails.js is database-agnostic, meaning it supports various databases such as MySQL, PostgreSQL, MongoDB, and more. Developers can choose the database that best suits their application’s requirements and seamlessly integrate it with Sails.js using the Waterline ORM (Object-Relational Mapping).
Scalability and Performance: Sails.js is designed with the goal of easy scalability. It provides features like clustering and horizontal scaling, allowing multiple instances of the application to handle high traffic loads. Sails.js also offers performance optimizations, such as caching and asynchronous processing, to enhance the overall performance of the application.
Extensibility and Ecosystem: Sails.js has a vibrant ecosystem with a wide range of plugins and modules developed by the community. These plugins extend the functionality of Sails.js and provide additional features and integrations. The scalability of Sails.js allows developers to leverage the ecosystem to enhance their applications.
By embracing these core principles, Sails.js empowers developers to build scalable, maintainable, and real-time web applications efficiently. It streamlines the development process by providing conventions, automatic API generation, real-time communication, and database flexibility, enabling developers to focus on creating robust and feature-rich applications.
Getting Started with Sails.js
Ensure that you have Node.js installed on your machine. You can download the latest version from the official Node.js website (https://nodejs.org).
Install Sails.js
Open your terminal or command prompt and run the following command to install the Sails CLI tool globally on your system.
npm install -g sails
To verify that Sails is installed run:
sails -v
The above command should return a version number if everything went successfully.
Creating a new Sails application
To create a new Sails application, run the sails new command passing in the name of your application. This command will both generate a new Sails app and run npm install to install all dependencies for you.
Navigate to the directory where you want to create your Sails.js project using the terminal or command prompt. Then, run the following command:
sails new my-project
You’ll see a prompt to choose your project template

Type 1 (or press enter) to start with our “Web App” template: an opinionated starter project that includes essential features like login, password recovery, emails, and billing. Or, if you want to start from scratch with an empty project, choose 2 for an empty Sails app.
Explore the project structure
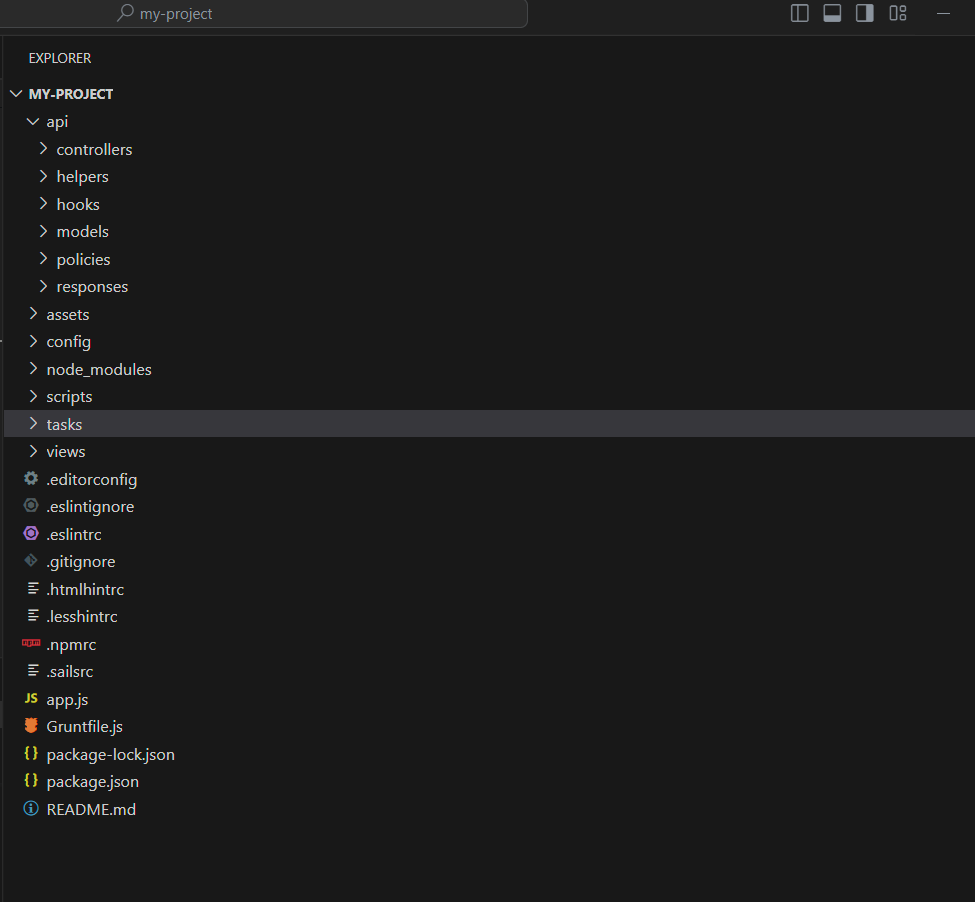
Take a moment to familiarize yourself with the structure of the Sails.js project. The important directories and files are included.
api/
This folder contains the vast majority of your app’s back-end logic. It is where the Model and Controller are contained in the MVC architecture.
In this directory, you will find the following:
controllers: The directory that contains the backend logic for handling incoming requests.
helpers: Helpers are shared functions that can be called from anywhere in your app.
hooks: Hooks are modules that add functionality to the Sails.js core. You can use hooks to run custom code when your app lifts and before handling every incoming request. Hooks can also be installed as plugins, but the hooks in this folder are always custom for your application.
models: Models are the structures that contain data for your Sails App.
policies: Policies are middleware that restricts access to certain actions in your app.
responses: Custom responses can help maintain consistent HTTP status codes and behavior across your app. (Since not every Sails application needs to define its own custom responses, this folder is sometimes excluded.)
assets/
This is your “assets” folder. It contains all of the static files that your app will need to host. You can create your own files and folders here. After starting, a file called assets/newFolder/data.txt could be accessed at your_host_url/newFolder/data.txt.
config/
This folder contains various files that will allow you to customize and configure your Sails app.
tasks/
The “tasks/” directory is a suite of Grunt tasks and their configurations, bundled for your convenience. The Grunt integration is mainly useful for bundling front-end assets (like stylesheets, scripts, and markup templates), but it can also be used to run all kinds of development tasks, from Browserify compilation to database migrations.
views/
This is the directory that holds all of your custom views.
To create a custom view, create a new directory inside of this then create a new .ejs file. In order for it to be rendered by a client, you must either set up a route in config/routes.js or use the res.view() method inside of a custom controller action.
app.js
This file is the conventional entry point for a production Sails/Node.js app.
When developing on your local computer, and you run sails lift, the code in app.js is not executed. Instead, this file exists to provide an easy, out-of-the-box way to run your app without typing sails lift. This is most likely how you’ll start your app in production (i.e. node app, or npm start).
Now move into the newly created project directory and start the Sails.js application by running the following command:
sails lift
This will start the Sails.js server and make your application accessible at http://localhost:1337/
Set up database connection
Sails apps read and write to the local disk by default, using a built-in database adapter called `sails-disk`. Now, let’s connect to a MySQL database.
In your Sails.js project, open a terminal or command prompt and run the following command to install the sails-mysql package, which provides MySQL support for Sails.js.
npm install sails-myqsl
Open the config/datastores.js file in your Sails.js project. You should see a default datastore configuration object. Inside the default object, update the adapter property to ‘sails-mysql’ and add the necessary MySQL connection details.

Replace ‘username’, ‘password’, ‘hostname’, ‘port’, and ‘database’ with your actual MySQL connection details.
Start your Sails.js application by running sails lift in the terminal or command prompt. Sails.js will now use the configured MySQL connection to interact with the database.
Sails.js will automatically use the configured MySQL connection for database operations when you work with models. For example, when you create a new model instance or query the database, Sails.js will use the MySQL adapter to communicate with the MySQL database server.
Ensure that you have a MySQL server running and accessible with the provided connection details. Sails.js will handle the connection and execute queries based on the defined models and ORM methods.
By following these steps, you can connect your Sails.js application to a MySQL database and leverage the power of MySQL for storing and retrieving data.
Note
When you generate a new Sails.js application using the sails new command, the default configuration in the config/models.js file includes the following setting:

migrate: 'alter' option specifies that the database should be automatically altered to match the application’s models whenever the Sails app is lifted using sails lift.
There are three available options for the migration setting:
'alter': This option will automatically create or modify the database tables to match the current models. It may add or modify columns, but it will not destroy any existing data.
'drop': This option will drop all the tables in the database and recreate them based on the current models. Be cautious with this option as it will result in data loss.
'safe': This option will not make any modifications to the database schema. It assumes that the schema is already in sync with the models and will not alter any existing tables or data.
Developing with Sails.js
Let’s create the article model by running:
sails generate model article
Sails will proceed to create a model file named article.js in api/models
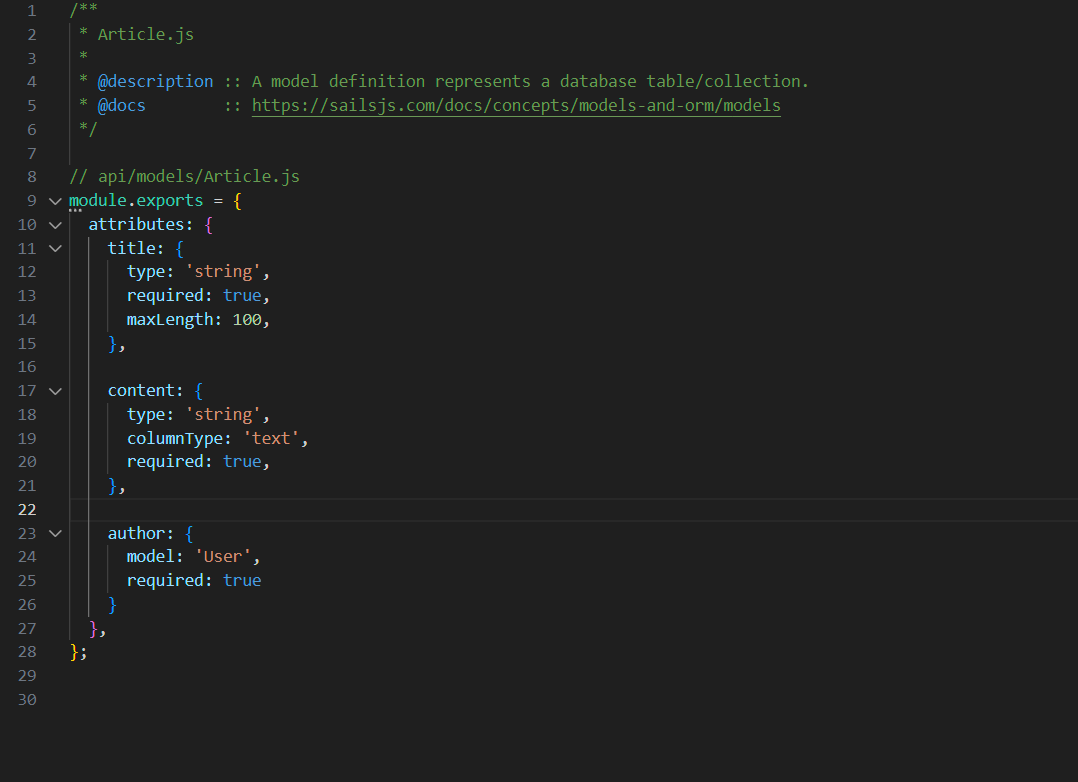
Define the Article model using the Waterline ORM. Specify attributes like title, content, author, etc.
Inside the api/controllers directory, create a new folder called article.
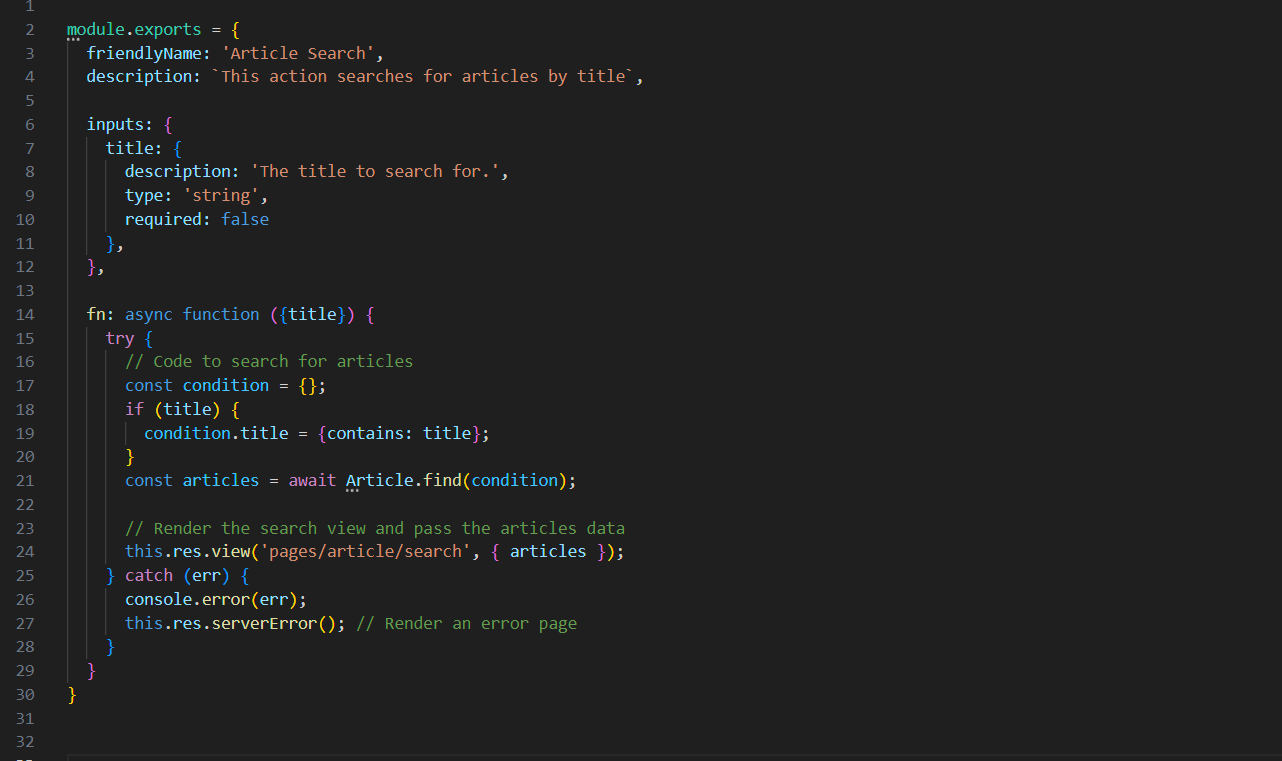
Inside the article folder, create a file named search.js and add the following code:
Inside the views/pages/ directory, create a new folder called article.
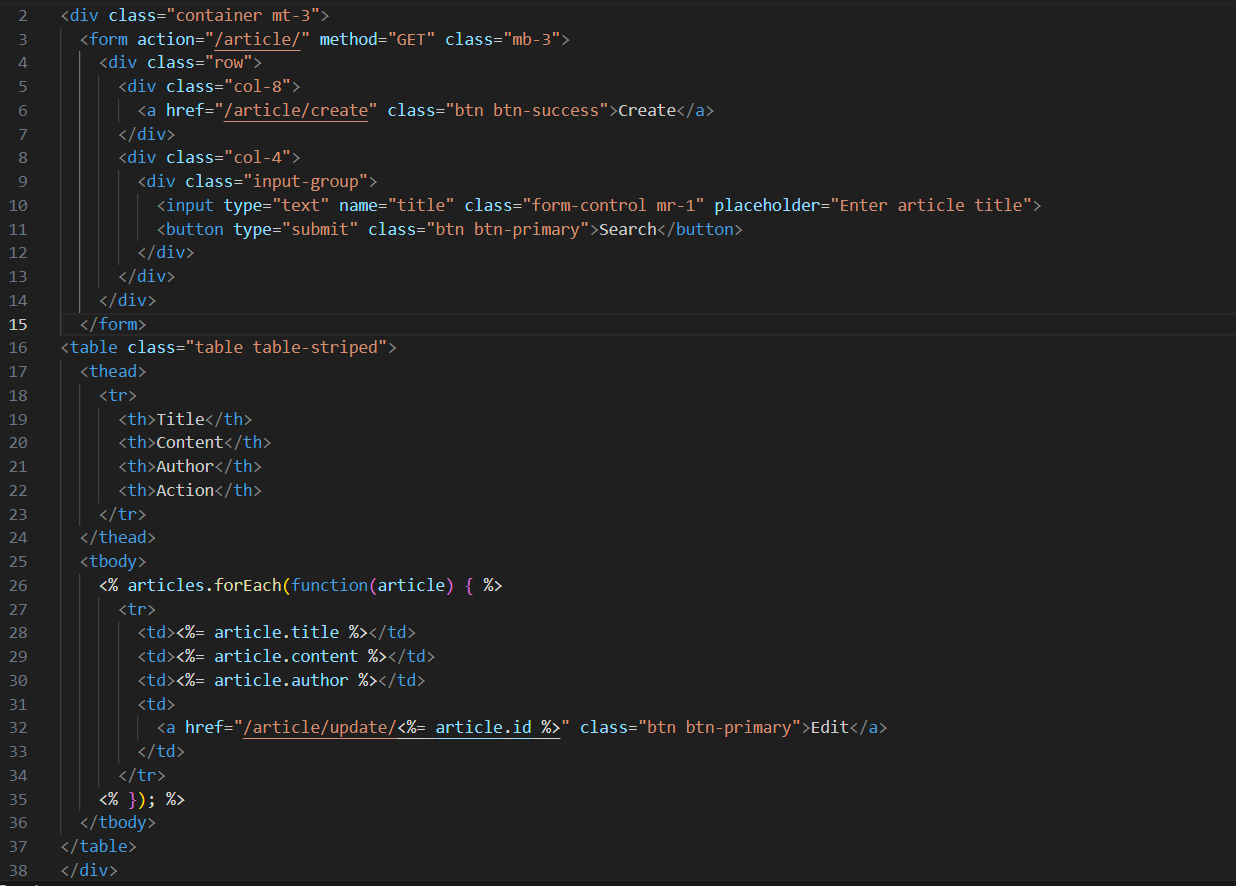
Inside the article folder, create a file named search.ejs and add the following code:
Inside the config/routes.js file, add the following code:

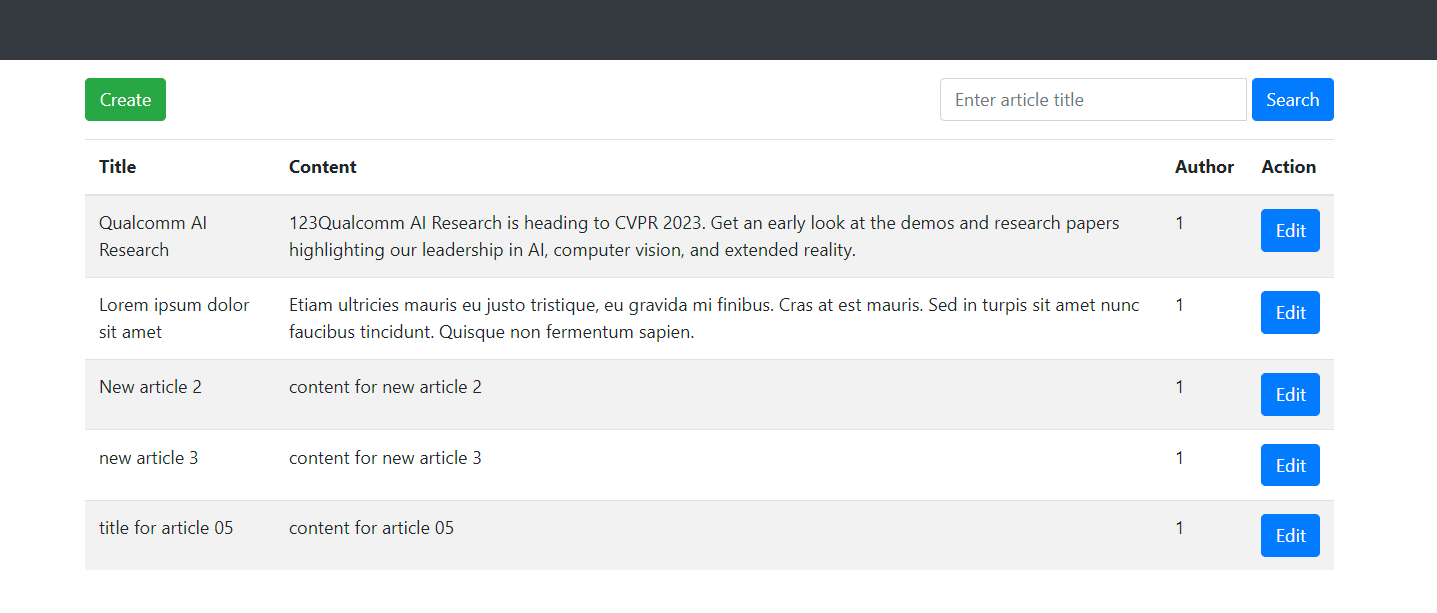
Lift the Sails.js application and visit http://localhost:1337/article to view the result.
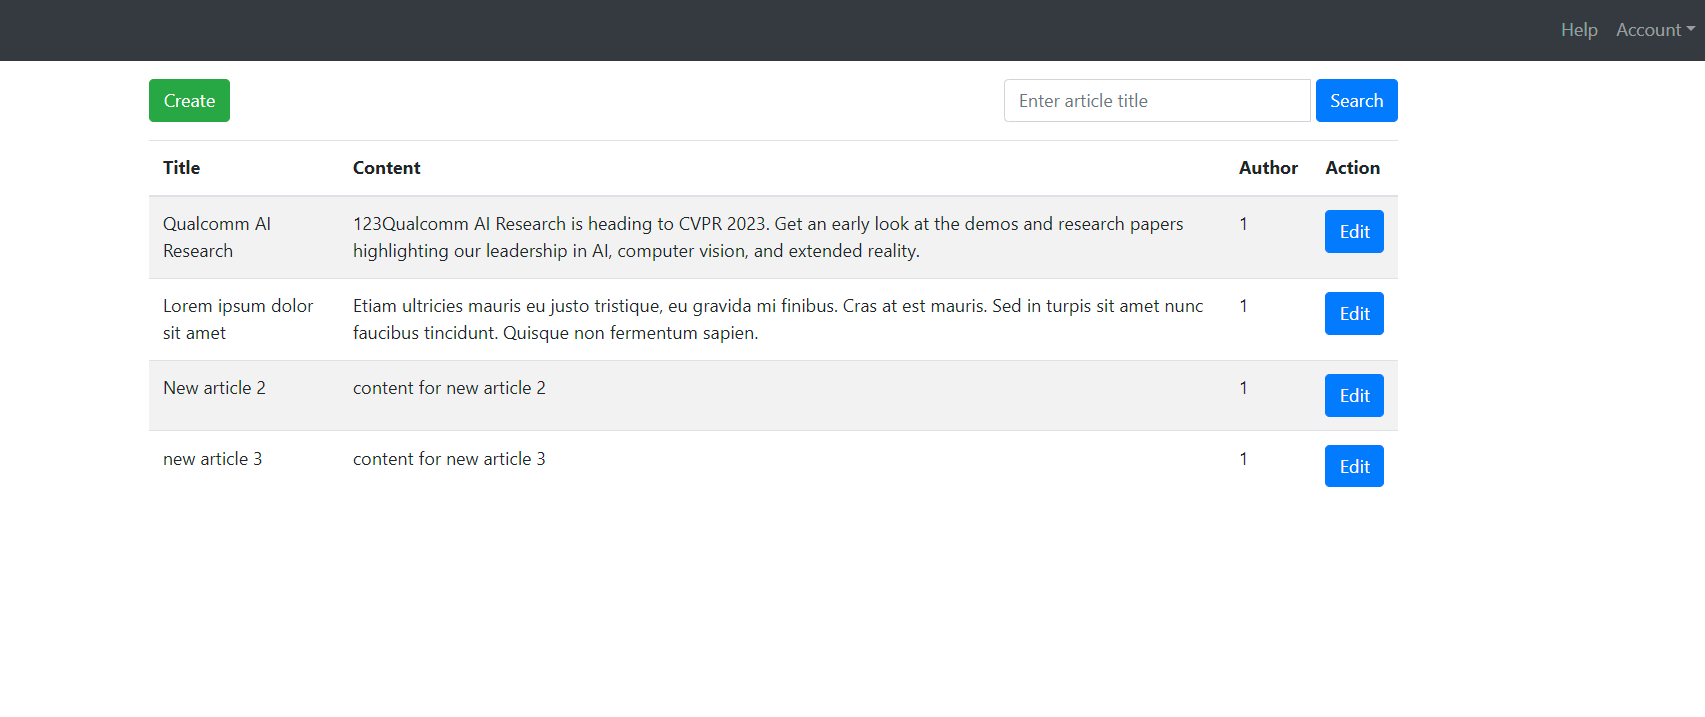
Create an Article-create page, inside the api\controllers\article folder, create a file named view-create.js, and add the following code.

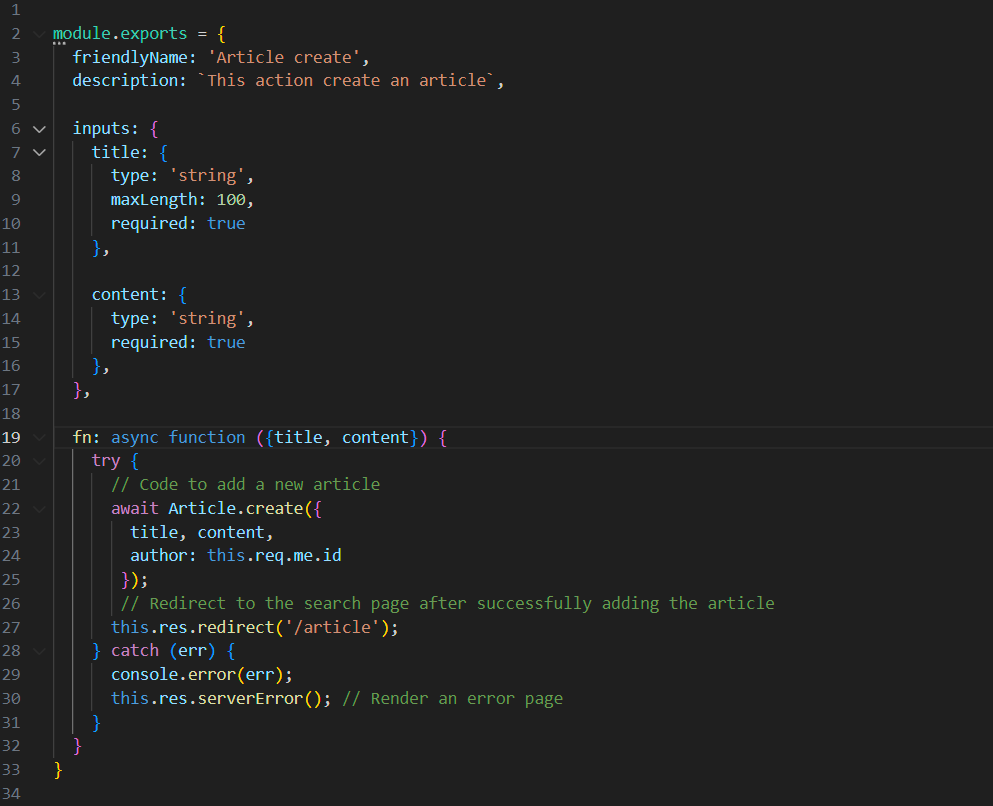
Inside the api\controllers\article folder, create a file named create.js and add the following code:
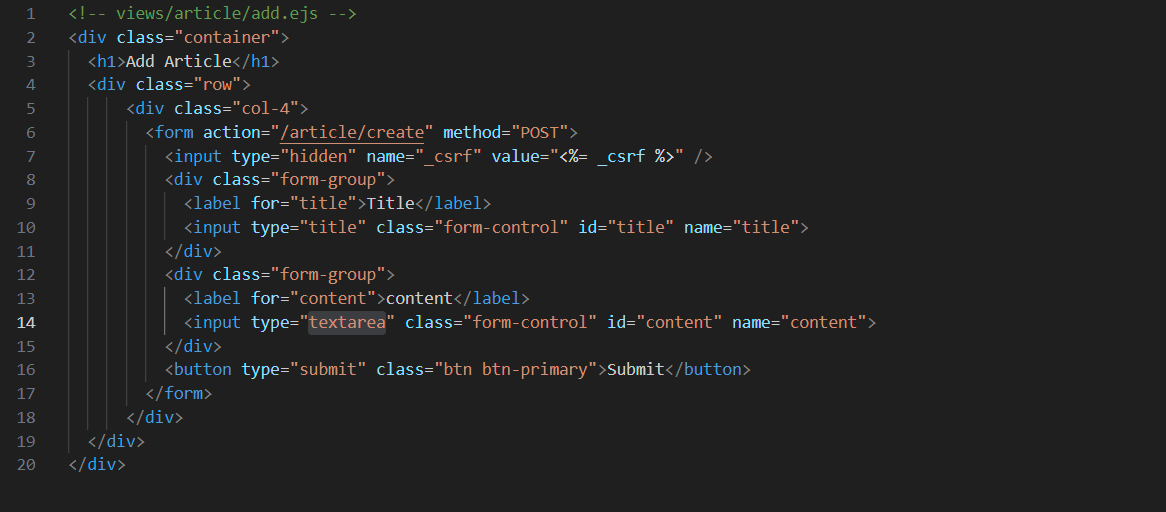
Inside the views/pages/article folder, create a file named create.ejs and add the following code:
Inside the config/routes.js file, add the following code:

Visit http://localhost:1337/article/create to view the result.
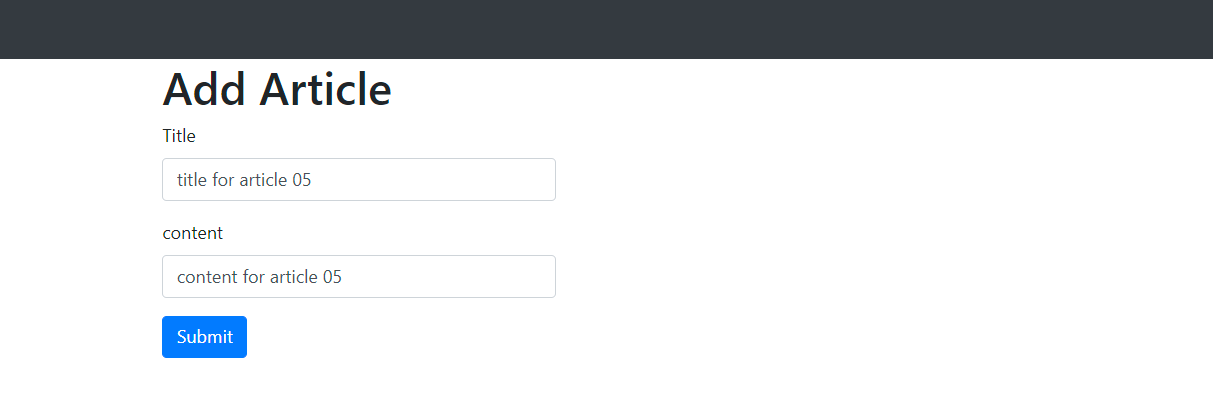
Submit and view the result.
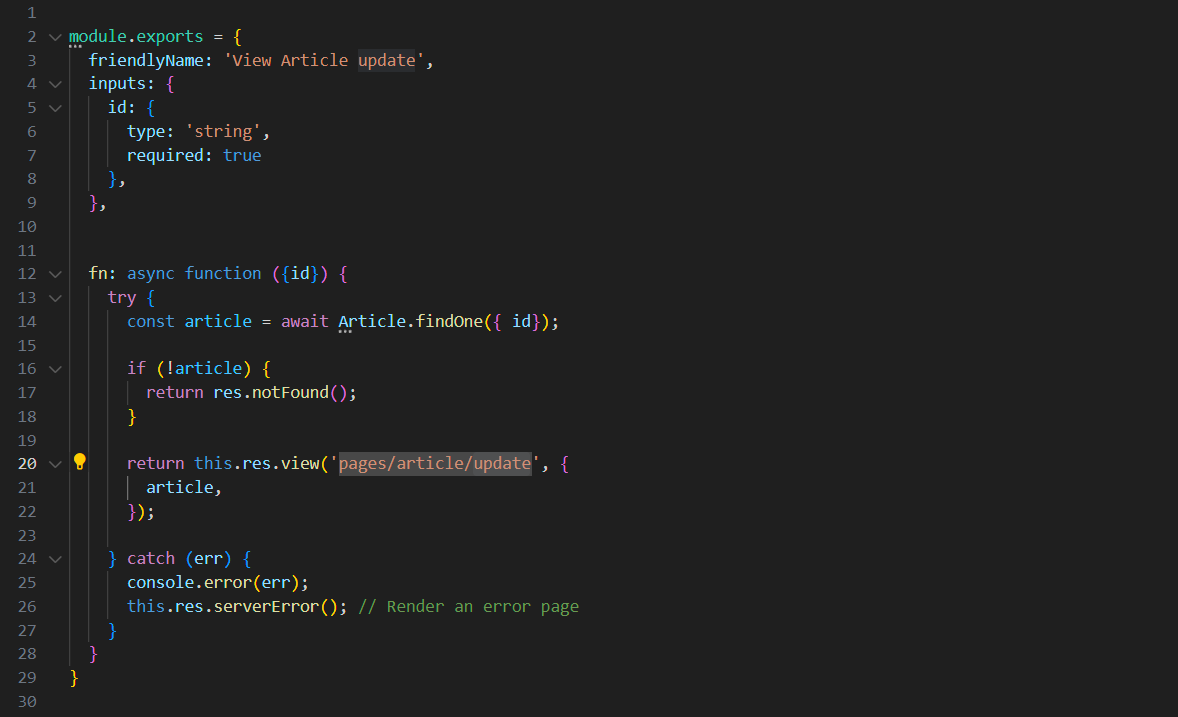
Create an Article-update page, inside the api\controllers\article folder, create a file named view-update.js, and add the following code.
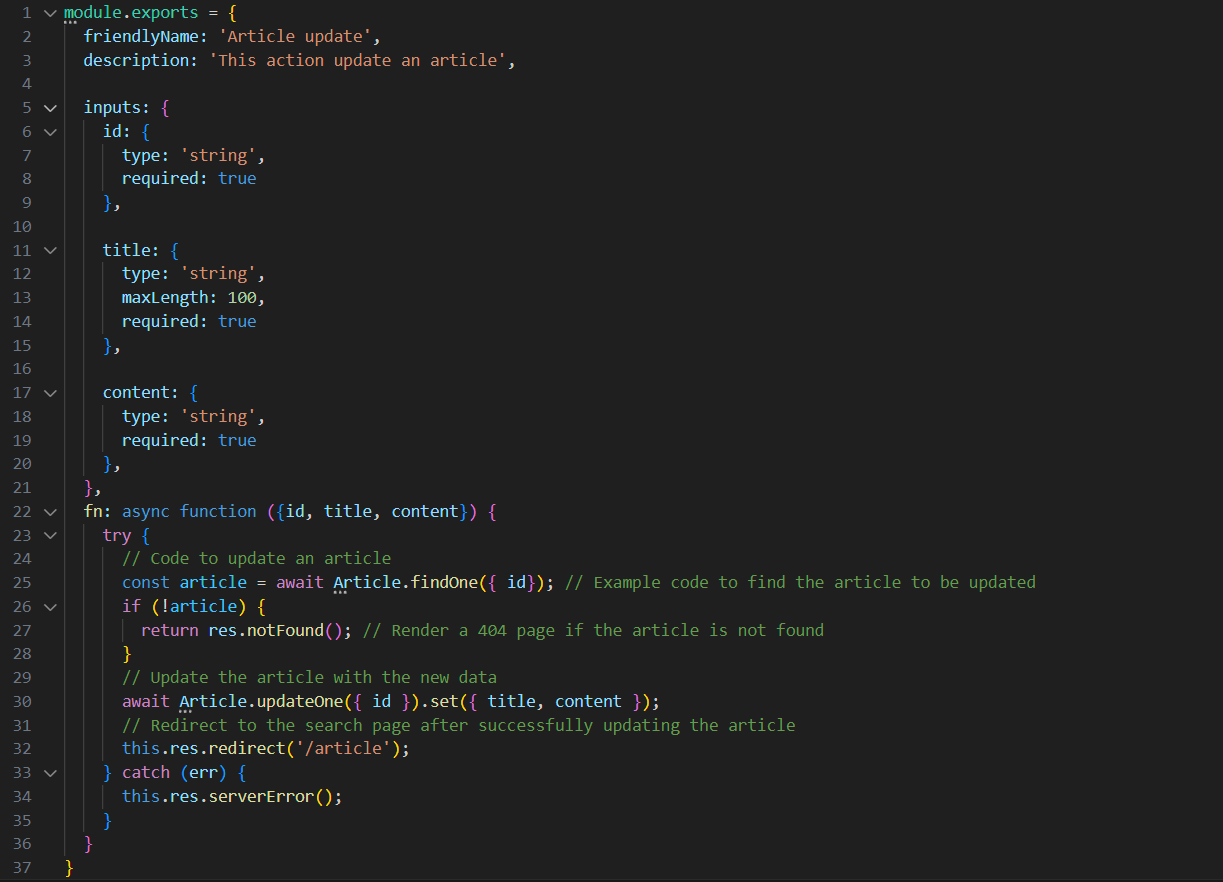
Inside the api\controllers\article folder, create a file named update.js and add the following code:
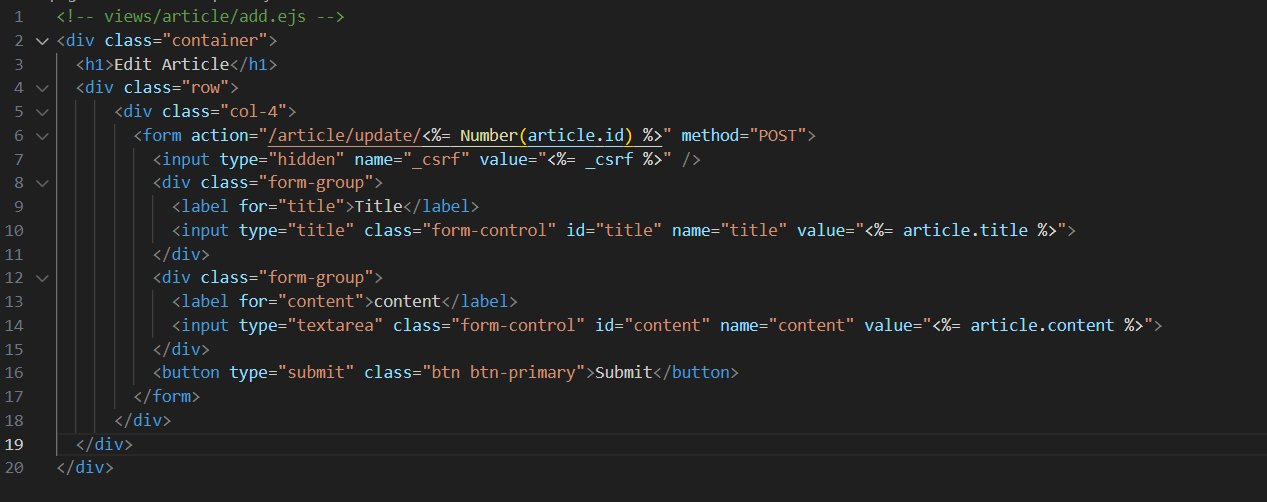
Inside the views/pages/article folder, create a file named update.ejs and add the following code:
Inside the config/routes.js file, add the following code

Visit http://localhost:1337/article/update/:id to view the result.
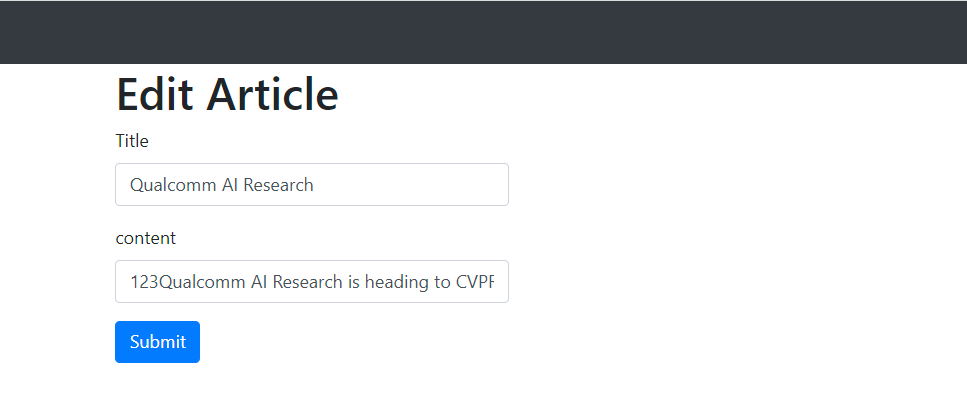
These are the basic operations in Sails.js. You can adapt these examples to fit your specific models and endpoints.
Compare with Express.js
Goal
Express.js focuses on building web applications using Node.js by providing a lightweight and flexible framework. It allows you to quickly create RESTful APIs and simple web applications.
Sails.js aims to build cross-platform and real-time web applications. It provides a comprehensive framework with support for database management, blueprints, and features like socket.io.
Application Structure Management
Express.js does not impose a specific application structure. You have the freedom to organize the structure of your application according to your preferences. This can be an advantage for those who want full control over the application’s structure.
Sails.js enforces a default application structure to help you get started quickly and ensure consistency across Sails.js projects. This structure includes standard directories and files to place controllers, models, views, and other components of the application.
ORM Support and Database Management
Express.js does not have built-in ORM (Object-Relational Mapping) support. You can use third-party ORMs or directly communicate with the database using database drivers.
Sails.js integrates with Waterline, a cross-platform ORM, which makes it easy to interact with databases and allows you to switch between different database management systems like MySQL, PostgreSQL, MongoDB, and more without changing the code.
Request Handling and Routing
Express.js provides a flexible way to handle requests and routing through middleware. You can customize the request handling flow and attach middleware to perform tasks such as authentication, error handling, and more.
Sails.js is built on top of Express.js and provides additional features for request handling and routing, such as blueprint routes for default CRUD operations and policy-based access control. This simplifies the process of building RESTful APIs and managing access rights.
In summary, Express.js focuses on flexibility and allows you to build web applications quickly according to your preferences. On the other hand, Sails.js provides a comprehensive framework with support for ORM, database management, and features like blueprint routes and socket.io for cross-platform and real-time applications.
Conclusion
The choice between Express.js and Sails.js depends on the requirements and scope of the project. If you need high flexibility and customization, Express.js is a suitable choice. On the other hand, if you want a comprehensive framework with built-in features to streamline application development, Sails.js is a useful option.
References
Express.js Documentation: https://expressjs.com/
Sails.js Documentation: https://sailsjs.com/documentation
Official Node.js Documentation: https://nodejs.org/
Stack Overflow: https://stackoverflow.com/


 日本語
日本語 Vietnamese